The content of this blog, including my art and worksheets, are copyright protected. I do give permission to reproduce for personal and classroom uses a reasonable, limited amount of my content. You do not need to contact me to ask for permission. All other use is forbidden. For more details see the permissions and restrictions statement in the footer. Please use the Paypal button to make your donation.
Showing posts with label Printmaking. Show all posts

Wednesday, March 13, 2013

Multi-Layered Print Making 2 Spectrum Home-school Community 3/14/12

Home School Art Printmaking continued.
Multiple layered prints. 

Some of our students continued on the multi-colored print project that was begun the week before.

Those that finished began a multiple-layered project to get experience with the translucence quality of the inks involved. To explore the effect students created an abstract or cubist print.

First, a general design was drawn on the block, we use cardboard. The first layer of abstract shapes was attached to the block using double stick tape.  The ink was applied and a print made. We traced around the abstract shapes with pencil on the block to keep as a reference for the second and later colors and then removed the shapes.

Next, a new set of shapes were attached to the block, the first having been removed. The second shapes have some areas of overlap with the first. (this is where the traced shapes help since we are laying on the same block). The second color applied and the second print made on the same paper. Note: be careful not to turn the paper upside down The shapes were outlined and removed as before.

Next, the process is repeated so each color has areas that overlap others and the combination make new hues and colors.

Last a little accent was added with a black outline of similar shapes.

The example has squares and rectangles but other shapes and random shapes can be done also.

Print making Lesson with Multiple Layers. 


(c)Adron Dozat


Thank you for visiting my blog.  I hope this project is fun and helpful for you. 

To find more like it see the labels at the right, use the search-box above, or choose one of the favorites in the left sidebar.  I am sure you will find one you like.

Adron


These are free to print but your small gift will help me keep this blog going, Choose your gift amount.

Use the share buttons below to share this, Thank you.

Thursday, March 7, 2013

Art 2 Print Making with Multiple Colors.

For the week of Feb 28 and March 7th and March 14 we will be working on a print project that will require the use of multiple colors and careful registration.

The first week has been design and transferring the design onto our block or in our case foam. The next week we proceeded to cut out the foam and attach to the acrylic using double stick tape. Using acrylic lets us "see" through the block to match us our prints so each color matches. A different block was made for each color.

The third week will be production and final print making of the projects.

The example below is from a similar class with younger students.


Thank you for visiting my blog.  I hope this project is fun and helpful for you. 

To find more like it see the labels at the right, use the search-box above, or choose one of the favorites in the sidebar.  I am sure you will find one you like.

Adron

(C) Adron Dozat

Tuesday, February 12, 2013

Art 2 How to do Easy Printmaking

Art 2 Print Making
2/07/13

We used Styrofoam plates to make a relief print. We drew a picture on plate and cut around it and taped the picture to a piece of cardboard and and then print the picture.

Ideas for subjects:
Cat, clown fish, rose, flower, face, name or word, dog, train engine or caboose, any animal.

Valentines day hearts. red ink on heart. a second design with black over the red.

Below is an example of using Styrofoam to make a raised relief print.

First a cat or panther face was drawn onto the Styrofoam, it was then cut out using a craft knife, and using double stick tape attached to a piece of cardboard, in this case it was the cardboard from a cereal box.

The detail of the eyes were inscribed using a pencil.

When inked with a brayer the ink remains on the raised surfaces.

When paper pressed onto it leaves the image of the panther.

Printmaking Using Foam Plates

Below is an example of the results. I chose to only make three prints but an artist could make many prints.


Relief Printmaking, Using Foam Plate and Cardboard.


Thank you for visiting my blog.  I hope this project is fun and helpful for you. 

To find more like it see the labels at the right, use the search-box above, or choose one of the favorites in the sidebar.  I am sure you will find one you like.

Adron


These are free to print but your small gift will help me keep this blog going, Choose your gift amount.

Use the share buttons below to share this, Thank you.

(c) Adron Dozat

Thursday, January 31, 2013

Printmaking with Styrofoam Plates Art Lesson

Spectrum Homeschool Art 2
Printmaking Week 3

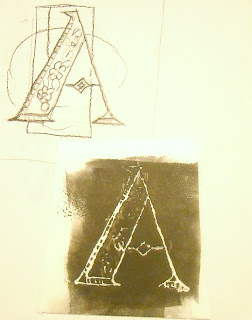
This week we used Styrofoam to create as a block to make a plate for our print. Styrofoam plates were cut to a workable size then the image was drawn with a pencil onto the Styrofoam plate pressing hard enough to leave an impression. The plate was inked using a brayer, paper was pressed onto the plate and the image transferred.

Each student did the letter from their name. (Apologies; the instructor forgot to mention the very important mirror effect of printmaking- everything comes out backwards.)

Students created several images.

Illustration of print making class work 
The illustration above shows the rough sketch, top, used to design the block, below. The block has been inked the white is the area depressed by tracing the design onto the Styrofoam.

Printmaking Class Block and two prints- mirror image.

The illustration above shows the block, center, and two images created by the block. Note the image is reversed.

Thank you for visiting my blog.  I hope this project is fun and helpful for you. 

To find more like it see the labels at the right or choose one of the favorites in the left sidebar.  I am sure you will find one you like.

Adron


(C)Adron Dozat

Thursday, January 24, 2013

Intorduction to Printmaking part 2

Printmaking lesson 2 for Spectrum Homeschool

This was the second lesson introduction for the printmaking class.

We did tracing prints. Tracing print is to lay a clean sheet of paper over the ink and then to trace a picture on the back of the paper. The ink will be pressed into the paper as we trace the picture. We did three or four images in class.

Below is an example of a Church window drawing on the right. The small paper was placed on the back of the larger paper on the left which lay on top of the ink and then traced. The ink was pressed into the paper reproducing the image.

Note the image is in reverse.


Illustration of tracing print
Below is another example of a tracing. A picture of a seagull was placed on the paper as it lay on the ink the seagull was traced leaving the image on the paper. Multiple images can be produced this way.

Example of tracing prints
Each tracing was a little less dark as the ink dried. It required refreshing.

(c)Adron Dozat

Thursday, January 17, 2013

How to Make a Print By Drawing In The Ink

Homeschooling Lesson for
Printmaking and Monoprint


This is the first lesson in our print making unit. We will briefly cover the concept of print making and the tools used.

Basic printmaking is to create a picture by transferring an image from a source to the paper. Most prints are done in editions where many images are produced. They are numbered and signed such as 1/10 meaing in this example one of ten.

Today we will be creating a monoprint. A monoprint is a edition of one.

To make our monoprint it is important to have a design already prepared since the ink dries in a few minutes and you do not have time to conceive and work out the details of your design. So we will take a few minutes and create some line drawings studies on scratch paper to be prepared for our project.

1. We apply a small amount (about the size of a quarter) of ink to the surface. We have Plexiglas, but any flat surface will work, like a mirror, a pie-pan lid, or plastic as long as it is absolutely flat.
2 We roll the ink with the brayer to cover an area,  about the 4 inches by 4 inches.
3. Choose one of the studies and using a very dull pencil, rounded chop-sick, Popsicle stick, crayon or any combination draw the image directly into the ink.
4. Carefully lay the paper directly on the plate with the ink and its drawing.
5. With one hand holding the project steady use the palm of the other hand to press the paper down, be careful not to smudge or move the paper from its original position.
6. Carefully lift the paper up.
7. Admire your creation!

Changes can be made in the original and a second print may be created, this second print will be lighter.

Experimenting is encouraged to make prints with lines shapes and texture.

We sign our works and label them Monoprint 1/1 and date.

Allow yourself 10 minutes for clean-up. Soap and water is fine.

Flowers: A Monoprint made by Drawing in The Ink.

Tree: a Monoprint made by Drawing in The Ink

Fish: a Monoprint Made by Drawing in Ink

(c)Adron Dozat

Thank you for visiting my blog.  I hope this project is fun and helpful for you. 

To find more like it see the labels at the right, use the search-box above, or choose one of the favorites in the left sidebar.  I am sure you will find one you like.


These are free to print but your small gift will help me keep this blog going, Choose your gift amount.

Use the share buttons below to share this, Thank you.