The content of this blog, including my art and worksheets, are copyright protected. I do give permission to reproduce for personal and classroom uses a reasonable, limited amount of my content. You do not need to contact me to ask for permission. All other use is forbidden. For more details see the permissions and restrictions statement in the footer. Please use the Paypal button to make your donation.

Thursday, January 10, 2013

Supply list for unit 3 printmaking by hand

Supply list for print making by hand.
Spectrum Home School Community

The third quarter is our printmaking unit.I am very excited about this course.
I am sensitive to the need to keep cost down so I suggest you consider the coupons available at most stores like Michaels, and Hobby Lobby. These supplies can be found at both locations, Michaels has shipping discounts available too.

We will be using ink. I only use the Speedball brand that comes in a tube. The individual tubes cost about 8 dollars.

1 Tube of black ink. we will use black for almost all projects
1 multi pack ink that has red, blue, yellow, and black.- these are smaller tubes. we will be using colors only after the 3rd week, so no rush.
(Optional) a brayer it is a rubber roller for applying ink to the surface, I have extras we can share if you can't get one. We may be borrowing some from another home school group.
A hard flat surface like a mirror, sheet of plexiglass, pie pan lid, plastic clip board etc. it needs to be washable.
Paper. We will use lightweight paper like common printer paper from your computer. We have received a donation enough for our needs.
Cardboard that can be cut easily like from a cereal box. Not needed the first two weeks.
Random junk that can be glued to a surface to make a printable collage, buttons, bobby pins, paperclips, bottle caps etc. Not needed until the 7 or 8th week but start collecting now.
Styrofoam plates for the 3rd and 4th week maybe 5th week. It needs to be the type of soft plate that one can press in image in and it stays down, and easy to cut.
Craft foam the type that is rubbery and soft there is an entire isle of it at Michaels we just need 1 sheet of 9x11 or something like that size. Any color.
Double sided tape.
White glue.
A few sheets of stiff cardboard like from the back of an old binder or sketchbook. We won't need this until the 2nd half of the unit.

If you are wondering: I will NOT be using knives to carve lino like our generation was taught back in the 70s. I have safety concerns. Lino is is a good method and makes wonderful projects but we only meet once a week and not enough time to complete a project, since most of our projects are done in one class.  If a student wants to cut lino with a set of carving knives they are welcome to bring the finished project to class to print. Instead of lino I use the rubbery craft foam that can easily be cut with scissors or craft knife.

(c)Adron Dozat

Thursday, January 3, 2013

Watercolor Painting With Abstract Effects

Art 2
Exploring the use of secondary objects to give interest in watercolor painting.

We will start with random shapes and spaces to make an interesting abstract picture. Our subject will be an owl or a cat or a face.

We will experiment with different mediums to create effects with the watercolor.

     * Sprinkle salt into the water wash. The wash must be very watery.
     * Tape off an area with blue painters tape before painting it. Do this before you paint.
     * Marking off  a pattern with a white candle for resist. Do this before you paint.
     * Applying crumpled tissue to the picture. Hold it down to the wet paper until it drys.
     * Applying crumpled cellophane to the picture. Hold it down until the paper drys.
     * Splatter around a marked off area.
     * Dribble and let color run in a random pattern. You may need to "tickle" it a bit with the brush to get the paint to run down and cross tape or candle wax.

Example project.

An example of abstract techniques.
Note in the example the taped off areas at an angle. The tape was left on in this instance until the project was done.

The candle wax mimics the pattern of the owl's feathers. This is best observed in the lower quarter.

Splattering is present in various locations. Contrasting color and Paynes gray was used in the splatter.

Dripping and random running of green and red color from the top down.

Unfortunately, the crumpled cellophane did not photograph well but if you look hard you can see the random creases in the upper right area.

Area that was covered with a circle of cardboard by the right wing.

To bring the owl back up an ink pin was used to outline the owl.

These were a lot of techniques to apply to one project. The purpose of this lesson  is to introduce these techniques. Practice is needed to master this approach, the students are encouraged to experiment with this approach on their own.
(c)Adron Dozat

How To Find an Idea For Drawing With Creativity

Spectrum Homeschool Community Art 1 
Drawing with Creativity
And How to Find Ideas.


Drawing with creativity is a drawing lesson that teaches how to come up with ideas through the free association method. 

Warm ups: 
Warm ups used for an art lesson. 
     1. Cursive "Cs" linked together like ocean waves. 
     2. Flame shapes. 
     3. Squares connecting to make a maze. 
     4. Using scribbling style draw an animal of their own choosing.

When an artist of any discipline have a block of creativity some will use free association methods to acquire ideas. This is done by noting down random thoughts or images, which relaxes the mind and allows the imagination to bring up ideas. The random thoughts can be noted in the margin of the sketchbook or a scrap of paper, or can be done as doodles. The random thoughts can be acquired from items in the room or items from resource materials one uses. After a few minutes, the ideas are experimented with to see if they produce a workable project.

Exercise one.
To help the young artist practice the technique a list of random words will be given, (different w). They are instructed to look at each word one by one and if a word gives an inspiration they write down the inspiration. The student repeats this process with each word until they have a concept for a project.

Step one:    Look at the word from the list.
Step two:   Get an idea from that  word.
Step three:  Record the idea, write down a word or scribble a picture.
Step four:   Explore your ideas on scratch paper.
Step five:   Combine ideas or choose one for your project.

Students are given ten random words from the sample word list below:

candle frog door love heart down cat screen angry bucket sunset ketchup shark spaceship submarine werewolf train bride pumpkin happy dirt crash money street candy window cloud blender stove chair rug book socks hat feather hand nest fish sad bucket tree friend remote river rock dock planter angel gong shoe puppy cake balloon band road trash soda store lost found up down right left clock five two twin tower Africa beach ray car skateboard river rock sing sting band-aid hero foe friend mom dad friend toothpaste egg pan evil good angel scarecrow owl lamp old young tree fire ladder flying running mouse.

These words are not the ideas but are the source of an inspiration. The young student is prone to simply take the words and illustrate them but the goal is to find a new theme or subject from the words.

Exercise two.

Similar to exercise one but without the word list. The student is asked to look around them and write down ten things they see and from those things create a project to draw.

Exercise three.

Similar to those above but without visual:
The student thinks of ten or more words and writes them down until the student gets an inspiration for a drawing.

If time allows the student is to illustrate a scene from a child's story of their choosing.

(c)Adron Dozat

Thursday, December 13, 2012

How to Draw With Dramatic Shadows

How to draw with dramatic shadows 
Spectrum art lesson 12/13/12

We will practice warm ups with:
     1. Shapes like the letter "Z" using the side of the pencil.
     2. Figure 8s keeping our fingers and wrist relaxed.
     5. Shadow bars going from dark to light to dark and back to light.
     4. Bricks in a pattern.

In this lesson we set up a table lamp on a subject so it cast strong shadows for the students to sketch. The first subject was shadows falling across the table surface at an angle. The subject matter included paper tubes which have shadows inside and shadows outside, a ball that has a round graduation of shadow, and a box that has a shadow in solid, a bowl and a few other items of interest.. The students observe how the shadow is not flat meaning there are subtle shades with lights and dark areas inside the shadow.

The second subject is complex and consists of a figurine and candlestick and other irregular shapes. The lamp is situated so the light is cast on the background against a surface, such as a wall, giving the subject a reference place in space.

The third subject has a lamp will be placed directly above some objects to case shadows below. The object will be a figurine, a ball, a wooden bowl.
Warm ups for this week 
These examples were not the ones used in class but I hope it gives an idea of what we were trying to do in drawing.

Example of Shadow From Above Lighting
Note in the example of the light from above the shadow falls directly below, seen best on the bowl, the ball is a little forward of the light and the shadow is cast forward, the box is a little to the left of the light and the shadow is tilted to the side.
Note the shadow within the shadow on the ball and the bow.
Pay attention to the reflective light.


Example of Shadow From Side lighting
In the example of the shadow from the side the shadow stretches across the table top. The shadow on the bowl is inside as well as beneath. The ball is inside the shadow of the bow. The shadow of the bowl falls across the box. The shadow of the ball and bowl has a dark "foot," the area where the bowl and table touch. The shadow of the ball stretches across the table top and gets fuzzier at the furthest edge.
Example of Shadow Against The Wall
In the example of the shadow against the wall we see many shadows. There is allot of reflected light bouncing back and forth giving shadows inside shadows. In our example the shadow against the wall is darker than the shadow on the table except for the edge where the bow sits on the table. Note the reflective shadow between the box and the bowl.

Water Color Painting With shadows.

Watercolor Painting With Shadows.
Spectrum art 2 
12/13/12

We will explore adding shadow into a picture by adding colors you might not think of.

We do not add black to make a shadow; we mix other colors to give a rich darker color or a muted color if it is desirable for the composition.

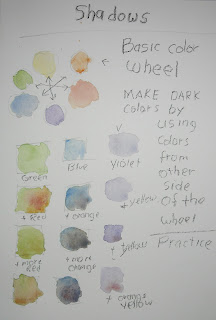
We will use a grid and practice mixing colors to add shadows. The colors in the grid will be opposite on the spectrum. This will be like a chart.

We will practice painting shadows on some basic shapes.

Example Of Shadow Chart.
To the left is an example of the exercise where we made a color chart. The color wheel on the top is a reference for the colors from the opposite side of the wheel.


In the example, we used various colors (Student's Choice), and in each consecutive box added more of the value from the opposite side of the color wheel to darken the original color. The first column started with a green box next box below added some red for darkening, and more red was added further down. The same process was repeated for the blue and the lavender.


Below is an example where a tree was painted, and the green was dabbled with some red to give shadows to the tree.


Example of using opposite color for the shadow.


(c)Adron Dozat

Thursday, December 6, 2012

Art 1 How to Use Photos To Compose a Picture.

Spectrum Drawing Art 1
How to Use Photos To Compose A Picture.
12/6/12

Warm up: We begin with four quick exercises to engage the brain. 1. short lines to make a maze. 2. drops of black water like syrup, 3 wavy lines 4. swirl lines like snakes.

Quick sketch challenge:We will draw a nutcracker that I will bring to class. This drawing will be done in 5 minutes.

Lesson:
We will use magazines to find pictures for inspiration. Each student will design their drawing using the inspiration from the magazine. The important thing is to define the point of interest and compose a pleasing picture not just copying the photo. Each student must use no more than 50% of the photo in the drawing, everything else is garnered from their imagination.

Warm up illustration.
Example of warm up exercise done in Spectrum Art 1
Illustration of the Quick Sketch Challenge.

Quick Sketch 5 Minute Drawing.
(c)Adron Dozat

How To Paint Snow in Watercolor Art 2

How to paint snow in watercolor.
Art 2

This is a very simple project; it is a good introduction to painting snow for the young artists.

We will start with a demonstration of "staining." I call it staining because the young artist sometimes has trouble with the concept of a wash technique, so I say we are "staining the paper" when we mean a VERY LIGHT WASH.  We want the water about 99% clear so it is only tinted, check the value on a sample of paper towel before applying to the paper.

Using a 2b pencil, lightly sketch in the barn and tree. We draw the horizon about a third of the way up from the bottom. There is nothing more boring than a picture cut in half by a horizon.

We start with a wet sky, turn the paper upside down and holding it at a slight angle, (we do not want the color to contaminate the snow) and using ALMOST CLEAR water with just a very little blue we wash in the sky color starting at the horizon and going to the top edge of the picture. We will add a little lavender halfway up and a little violet further up. The effect is to be a sky that is darker and looks colder. We let this dry. The young artist may need a second project to occupy themselves while this part dries.

The snow is done in a similar way. We do a VERY LIGHT WASH of almost clear water but with a little blue from the sky mixture.

After the snow dries under-paint the barn a pale red and the foreground tree a pale brown. Under-painting is flat and without detail, we use the lightest color for this step. While the barn is still wet we add a little lavender for the shadow, don't overwork it, drop a little bit in, and let it go. While the barn dries we will add a few sweeps of light blue color to the snow and some lavender for the shadow under the tree.

When the barn is dry we "draw" the boards and details using the very tip of the brush and a darker red. When the tree is dry we use the same technique of using the tip of the brush to draw texture and branches with a darker brown. Some blue is added to the brown to give it the darkest area. This dark tree is a contrast to the whites in the picture, so take some time with it and draw a lot of interesting branches with your brush.

The background is done when the sky and snow is dry. Lay the brush down and roll or drag it sideways across the horizon so the color is irregularly applied. While the background is still wet dapple some darker browns at the base to look like bushes and smaller trees.

A few posts will help to break up the large white snow areas if needed.


Example used during the class of Stain technique (light wash) for snow. This stage shows under-painting.


How to paint snow in watercolor lesson for young artist. Example prepared before class.

(c)Adron Dozat