The content of this blog, including my art and worksheets, are copyright protected. I do give permission to reproduce for personal and classroom uses a reasonable, limited amount of my content. You do not need to contact me to ask for permission. All other use is forbidden. For more details see the permissions and restrictions statement in the footer. Please use the Paypal button to make your donation.
Showing posts with label how to paint a picture.. Show all posts

Friday, July 9, 2021

How to Paint a Picture of the Traveler's Backpack Worksheet and Art Lesson

I am delighted to share my how-to-paint A picture of the traveler's backpack. 

👇👇👇SCROLL DOWN TO ACCESS THE FREE PDF.

You may print the images below.


How to Paint a Picture of the Traveler's Backpack Worksheet and Art Lesson


Below is a supplemental page with the outline to trace on a large scale. 

How to Paint a Picture of the Traveler's Backpack Pattern
It takes me days to create a worksheet like this, but I do it because I believe when God gives you a gift, it is so you can be a gift. These worksheets are helpful for you. 

If you have problems printing the image above, then try the PDF file below.

👉👉👉 CLICK HERE for a file in PDF

This worksheet is a great practice project for young artists. It doesn't use too many colors and has some opportunities to experiment and develop your style and technique.

You can download and save this lesson in class or at home. You may print it and give it to students as homework or an extra-time activity. You may also put it in a file ready to give to students who need encouragement or lack ideas about what to paint. 

PRINTING

The file above is a JPEG and should print nicely on most systems. If you have any problems, CLICK HERE to visit my HOW TO PRINT page for some suggestions. 

SUPPLIES

You can use any watercolor paint. I prefer my small Windsor Newton paint set; it has a nice selection of colors. I also use Grumbacher Paints in the tubes.  You can easily find these at any craft store like Lobby Hobby or Michaels. (Look for coupons online.) You can collect lots of paintbrushes, but it is better at the start to keep it simple with a few small, medium, and medium-large brushes and a combination of flats as well as rounded paintbrushes. For these art lessons, I use Strathmore series 300 Watercolor paper. It is economical and available at Michaels and Hobby Lobby and online. 

THE SUBJECT

This is an uncommon subject. It makes a great still life, and the backpack's nature tells a story. I modeled this project after my daughter's canvas backpack, which she takes everywhere. It has character and history. Practice with my project and then apply what you learn by painting a picture of your own backpack.  

PROJECT NOTES


TRACE THE DESIGN
Start by tracing the outline onto 140 lb watercolor paper.  This is the heavy paper that will not buckle when it is wet. You can find it at any craft store or office supply. I used Strathmore 300 series watercolor paper; it is ideal for practice and a beginner's level use.  I purchase it a Michaels or Hobby Lobby because I can always find an online coupon (you know us starving artists always looking to save a penny).

If you have problems seeing the outline through the paper, try holding it to the window with the light shining through. 

You can use watercolor from tubes or from a set. I use a portable Windsor Newton pant set. You do not need any fancy brushes for this project, but different sizes help. I prefer using natural hair brushes, but many modern synthetic brushes work fine for a beginner. 

BACKGROUND 
I like to start by painting the lightest colors. Wet the background around the backpack first. Next, apply some light-blue color into the upper areas with a wiggle motion of your brush.  Mix a little plumb purple and dark blue and with a wiggle of your brush, put it in the lower areas around the backpack. Give the background some movement by allowing the colors to blend. Add a VERY LITTLE black where the shadows are on the right side and a VERY LITTLE on the bottom edge of the backpack. 

UNDERPAINT THE BACKPACK 
Mix a little yellow and light brown. Carefully so that you stay in the lines, put the yellow-brown mix on the backpack's body. This does not need to be even; if it is randomly uneven, that will help the back have character. --LET IT DRY--- a lot of the yellow will be covered, but some will remain to give the impression of highlights.

BUILD UP THE CANVAS COLOR
After the yellow is dry, use a little light brown and paint in the canvas of the backpack- DONT COVER IT ALL, leave parts of the yellow showing.

This is because it is easier to put a dark color on top of light color than to put light color on top of a dark.

ADD SOME BROWNISH SHADOWS
Mix chocolate brown and a VERY LITTLE BLACK and with a small brush, add some shadows. 

ADD DETAILS
Mix some red and brown together to make a cinnamon color and paint the straps. Use red on the edge piping details. After the red dries, add some darker red for shadows and interest. 

DETAIL THE BUCKLES
Mix some blue-black that is more blue than black and paint the buckles on the straps. LET IT DRY, mix some black blue that is more black than blue, trace around the buckles' edges, and leave some dark blue showings. 
 
Finish by adding details like the blue cord, buttons, straps, and more shadows on the edges.
Sign and date your work about an inch from the bottom, so there is room for a frame. 
I hope you create a masterpiece! 

(c)Adron Dozat
7/9/2021
Sunday, October 25, 2020

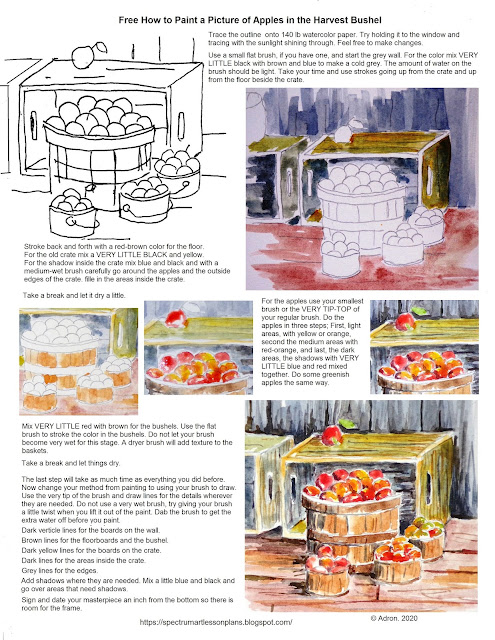
Free How to Paint a Picture Worksheet of Apples in the Harvest Bushel

Here is a Free How To Paint Apples in the Harvest Bushel Worksheet.

 
This picture was inspired by a visit to a fruit stand in autumn. It celebrates the blessings of the harvest and the Lord, who gives us much to be thankful for. 


How to Paint a Picture Of the Apple Harvest Bushel Worksheet 


My printables are free, so print as many as you like. They take a lot of my time.  I often have to create several images before I get the right one for an illustration.  It is a lot of work, but I am glad to have the opportunity to inspire others.
I only ask that you consider making a donation. Your gift of support will enable me to create more worksheets for you. Thank you for your support.

Here is a link to a PDF file that may work better for some printers.

CLICK HERE for a PDF of this worksheet. 


If you have problems printing this worksheet, CLICK HERE to visit my how-to-print page for some suggestions.  or try the updated link below.

This is a great little project for the beginner. This picture is somewhat simple. It is and is not intended to be overly realistic. I always felt if you wanted something as real as a photograph then you should buy a camera. You can use this worksheet as a beginning point and add your ideas and interpretations, so it is ok if your finished picture does not look like mine. (It might look better).

SUPPLY LIST

You can use any watercolor paint. I prefer my small Windsor Newton paint set; it has a nice selection of colors. I also use Grumbacher Paints in the tubes.  You can easily find these at any craft store like Lobby Hobby or Michaels. (Look for coupons online.) You can collect lots of paintbrushes, but it is better at the start to keep it simple with a few small, medium, and medium-large brushes and a combination of flats as well as rounded paintbrushes. For these art lessons, I use Strathmore series 300 Watercolor paper. It is economical and available at Michaels and Hobby Lobby and online. 

PRINTABLE NOTES

Start by tracing the outline of the picture onto 140 lb watercolor paper. If you have trouble seeing it through the paper try holding it to the window and tracing with the sunlight shining through. Do not be too worried to get it right, feel free to make changes. 

Use a small flat brush, if you have one, and give the grey wall the first wash. For the color mix VERY LITTLE black with brown and blue to make a cold grey. The amount of water on the brush should be light. Take your time and use strokes going up from the crate and up from the floor beside the crate. 

Use the small flat brush to stroke back and forth with a red-brown color for the floor.
 
Use the small flat brush and stroke the color on the crate. The crate is old and weathered looking so mix a VERY LITTLE BLACK and yellow so it looks dull. 
You may need to switch to a round brush for the shadow inside the crate. Mix blue and black and with a medium-wet brush carefully go around the apples and the outside edges of the crate. fille in the areas inside the crate. 
Take a break and let it dry a little.

Mix VERY LITTLE red into some brown for the bushels. Use the flat brush to stroke the color in the bushels. Do not let your brush become very wet for this stage. A dryer brush will add texture to the baskets.  

For the apples use your smallest brush or the VERY TIP-TOP of your regular brush. Do the apples in three steps; First, light areas, with yellow or orange,   second the medium areas with red-orange, and last, the dark areas, the shadows with VERY LITTLE blue and red mixed together. Do some greenish apples the same way. 

Take a break and let things dry. 

The last step will take as much time as everything you did before. 
Now change your method from painting to using your brush to draw. Use the very tip of the brush and draw lines for the details wherever they are needed. Do not use a very wet brush, try giving your brush a little twist when you lift it out of the paint. Dab the brush to get the extra water off before you paint. 
Dark verticle lines for the boards on the wall. 
Brown lines for the floorboards and the bushel. 
Dark yellow lines for the boards on the crate. 
Dark lines for the areas inside the crate. 
Grey lines for the edges. 

Add shadows where they are needed. Mix a little blue and black and go over areas that need shadows.  

Sign and date your masterpiece an inch from the bottom so there is room for the frame.

10/25/20 Adron © 2020

Please consider becoming my Patreon. Thank you.
Become a Patron!

Monday, March 2, 2020

Free How to Paint a Picture of a Bird of Paradise Flower, Lesson and Worksheet.

Free how to paint a picture of a bird of paradise flower, an art lesson, and a printable watercolor worksheet.


This is a good practice project that will help a young artist, or a beginner become more confident in basic art. It is not hard and uses a simple color combination so you do not need to spend a fortune on supplies. 

Remember to set your printer to color.

A WORD ABOUT PRINTING THE WORKSHEET
If you have problems printing, CLICK HERE to visit my how-to-print page for some suggestions.  Or try the updated PDF link below, which should print better.

I started creating these worksheets as a handout for when I was teaching homeschoolers. I am humbled to think that they are used by thousands of families all over the world.

How to Paint a Picture of a Bird of Paradise Flower, Lesson, and Worksheet.

My printables are free, so print as many as you like. They take a lot of my time.  I often have to create several images before I get the right one for an illustration.  It is a lot of work, but I am glad to have the opportunity to inspire others.
I only ask that you consider making a donation. Your gift of support will enable me to create more worksheets for you. 


Thank you for your support.

If the image above does not print for you then try the PDF. 

CLICK HERE for a PDF file.

ART SUPPLY LIST

You can use any watercolor paint. I prefer my small Windsor Newton paint set; it has a nice selection of colors. I also use Grumbacher Paints in the tubes.  You can easily find these at any craft store like Lobby Hobby or Michaels. (Look for coupons online.) You can collect lots of paintbrushes, but it is better at the start to keep it simple with a few small, medium, and medium-large brushes and a combination of flats as well as rounded paintbrushes. For these art lessons, I use Strathmore series 300 Watercolor paper. It is economical and available at Michaels and Hobby Lobby and online. 

PRINTABLE ART LESSON NOTES.


BEGINNINGS
Trace the design onto 140-pound watercolor paper, this is the heavy paper that will not buckle. If the paper is too thick to trace through place it against a window with the light shining behind it and then you should be able to trace it easily.

UNDERPAINT THE YELLOW HIGHLIGHTS
The flower looks orange, but start by painting the yellow highlights first. Let the yellow dry.

PAINT THE ORANGE ON TOP OF THE YELLOW
Using long strokes from top to bottom paint the orange on top of the yellow but leave yellow highlights showing.

BLUES
Use light blue to paint and the tongue-like-part sticking out. After the light blue dries mix some red to make violet and paint the shadows, but be careful to leave the light blue highlights showing in places.
For the blue body use light blue for the highlights and while the paper is still damp add violet blue for the lower shadows. While that is still damp use VERY LITTLE black for the darkest shadows on the bottom edge.

GREENS
For the leaves, use light green for the highlights. After the light green dries use dark green for the leaves and the stem.

BACKGROUND
You may want to leave the background white.

Or you can mix A LITTLE BLACK with some green and carefully go around the flower and make the background a little darker so the flower stands out.

Sign your work about an inch up from the bottom that way there is room for the frame.

(c) Adron 3/2/20

Please consider becoming a Patron. Thank You.
Become a Patron!

Friday, May 17, 2019

How to Paint a Picture of a Butterfly on a Flower, Watercolor Worksheet for the Beginner

How to paint a butterfly picture art lesson and worksheet.


This is a good practice project and skill builder for any young artist or beginner.
 
How to Paint a Picture of a Butterfly on a Flower
Worksheet And Art Lesson 


My printables are free, so print as many as you like. I only ask that you consider making a donation. Your gift of support will enable me to create more worksheets for you. 
Thank you for your support.


A WORD ABOUT PRINTING THE WORKSHEET
If you need help printing, CLICK HERE to visit my how-to-print page for some suggestions. There is an updated link below that may print better.

👉👉👉 CLICK HERE for a PDF file.

ART SUPPLY LIST

You can use any watercolor paint. I prefer my small Windsor Newton paint set; it has a nice selection of colors. I also use Grumbacher Paints in the tubes.  You can easily find these at any craft store like Lobby Hobby or Michaels. (Look for coupons online.) You can collect lots of paintbrushes, but it is better at the start to keep it simple with a few small, medium, and medium-large brushes and a combination of flats as well as rounded paintbrushes. For these art lessons, I use Strathmore series 300 Watercolor paper. It is economical and available at Michaels and Hobby Lobby and online. 

PRINTABLE NOTES.


BEGINNINGS
Trace the design onto 140-pound watercolor paper, this is the heavy paper that will not buckle. If the paper is too thick to trace through place it against a window with the light shining behind it and then you should be able to trace it easily.

BACKGROUND
Wet the paper all around the butterfly and the flower. Be careful to not cross over into the butterfly or the flower. Mix some watery green and "Drop" it into the background in different places. To give the background movement and interest drop into some watery yellows into the green with a clean brush drop in some watery blues into the background. For the darker areas drop in some watery lavender or purple into some places. Let the colors flow and blend and mix in interesting ways. You may need to use a tissue to blot some out or use a brush to help the colors to blend.

LET THE BACKGROUND DRY BEFORE YOU GO ON.

Use light green for the stem and leaves. You can give the leaves and stem more brilliance by going over the background around it with a wash of lavender, purple or violet.

BUTTERFLY WINGS STEP ONE
Use a watery yellow-orange color for the bottom sections of the wing. While it is still wet paint in some orange-red for the top areas. Try not to go into the places set aside for white. Let the paper be the white color there.

WINGS STEP TWO.
Use black and the tip of a small brush to draw the body and black edging of the wings. Be careful to go around the white areas. Go over the body in the same way. After the orange has dried use black to paint in the three dots on the lower wing.

FLOWER STEP ONE
With the tip of a small brush use a light blue-green color and draw details and shadows on the white part of the flower. it should be very light.

FLOWER STEP TWO
With a medium brush use yellow to paint the center of the blossom. While it is still wet use the tip of a small brush and dab orange around the bottom edge of the center.

THE ANTENNA
DO NOT PAINT THE ANTENNA! Instead, use a fine-tipped marker and just draw them in. Mixing media is an acceptable practice and is a sign of a mature artist.

Sign your work about an inch up from the bottom that way there is room for the frame.

(c) Adron Dozat 5/17/19

Become a Patron!

Saturday, October 22, 2016

How To Paint A Picture Of An Island In The Lake

This is an easy art lesson with a printable worksheet that can be used in class or at home.


The mountain lake with the island is a classic picture and a fun project that any young artist will like to try.  When finished, the young artist will have a sense of accomplishment and confidence.

Remember to set your printer to color.

A WORD ABOUT PRINTING THE WORKSHEET
If you have problems printing, see the "HOW TO PRINT" tab above or try one of the updated links below that should print better.

To see a finished version updated version of this project, CLICK HERE.


How to paint a picture of an island in a lake

I am happy to provide these How-to worksheets for free, and you are welcome to print as many as you like. Please make a contribution through Paypal to support my worksheets.


If the file above gives your printer trouble, the PDF below. 

CLICK HERE for a file in a universal portable format.


ART SUPPLY LIST

You can use any watercolor paint. I prefer my small Windsor Newton paint set; it has a nice selection of colors. I also use Grumbacher Paints in the tubes.  You can easily find these at any craft store like Lobby Hobby or Michaels. (Look for coupons online.) You can collect lots of paintbrushes, but it is better at the start to keep it simple with a few small, medium, and medium-large brushes and a combination of flats as well as rounded paintbrushes. For these art lessons, I use Strathmore series 300 Watercolor paper. It is economical and available at Michaels and Hobby Lobby and online. 

PRINTABLE NOTES


Trace the design on watercolor paper. If it is too hard to trace, try to hold it against a window with the light coming through to see it better.

The first step is really watery. Wet the paper with a large brush and apply watery blue and lavender for the sky and lake. Leave some areas white.
With a small brush, put some watery green for the trees across the lake in the mountain.

LET IT DRY BEFORE GOING ON.

With a small brush, use watery browns and yellows for the sunny parts of the distant mountains; use blue and lavender for the shadows. Put some mountain colors in the lake by brushing back and forth randomly.

With the small brush, use some not-so-watery green and lavender for the island trees. Use some browns and violet for the rocks and use some bright green for the bushes on the island. Put a little in the water below.
The island must be darker than the mountains; if you need a little black, use it carefully.

After it has dried, use a small brush and not so watery color to add details to the mountains, lake, and island.
The mountains should have a soft, distant look use some clear water and tissue to soften the background.

(c) Adron. 10/22/16
Become a Patron!

Wednesday, July 29, 2015

How to Paint A Happy Mouse Watercolor Printable Worksheet

This free worksheet is a fun little project for beginners to help get some basic principles of watercolor. 

You do not have to make a donation to download my coloring pages. But if you want to the donate button is below the picture.

It features a happy little mouse who escaped the mousetrap with the cheese. The limited selection of colors helps keep the project simple.

Remember to set your printer to color.


How To Paint A Picture Of A Happy Mouse.


Thank you for your support.

Below is a link that may print better on some printers. 

CLICK HERE to go to an image file that may work better with newer printers.


A WORD ABOUT PRINTING THE WORKSHEET
If you have problems printing, CLICK HERE to visit the -how-to-print page for some suggestions. or try one of the updated links below that should print better.

LESSON NOTES


SET UP
Use 140 lb watercolor paper. It is heavy and absorbent. Trace the outline of our happy mouse on it just slightly lower than the center. If you have trouble tracking it try holding it against a window with the light shining through.

FIRST WASH
Use a big paintbrush. Use watery brown to give the mouse an even flat wash of brown.

While the mouse is starting to dry, give the wall a watery wash of blue and brown mixed together to make a light grey. We want just a hint of grey; if it is dark, use a paper towel and dab it up a little.  

Use some watery yellow or on the floor and watery brown on the side of the mousetrap.

Use some blue inside the mouse hole.

SECOND WASH- After the first has dried.
Use a small paintbrush.
Mix brown and blue and add the shadows to the mouse around the tummy, legs, arms, and under the chin.

Add a little violet or rose to the mouse hole to deepen the color next to the wall edge.

Use violet for shadow around the feet of the mouse and around the mousetrap.

Use yellow on the cheese.

DETAILS
Use a little watery red for the cheeks and inside the ears.

Mix blue and brown and put dark grey on the spring and trigger of the mousetrap.

Use yellow mixed with a little orange for the sides of the cheese.

Add a touch of dark blue to the shadow under the mouse, but just a little.

AFTER IT DRIES
If you have lost the detail of the whiskers, smile, or eyebrows, then use a pencil or sharpie to draw them back in.

(c) Adron D. 7/29/15

Support my art by joining my Patreon community.
Become a Patron!

Thursday, July 16, 2015

Printable Painting Worksheet, How To Paint Two Flowers In A Vase.

This is a simple how-to print a picture lesson and worksheet, but when it is done, it will look nice in a frame or on a greeting card. 

The flowers are inspired by the red coneflowers in my wife's garden, but it could be adapted for white daisies or yellow ones very easily.  Parents and teachers will be able to use this printable worksheet in class or as a take-home project.

Remember learning to paint takes practice, so do one or two as practice first.

A WORD ABOUT PRINTING THE WORKSHEET
To print the free worksheet above just highlight it and send it to your printer.  If you have problems printing, CLICK HERE to visit the -how-to-print page for some suggestions. . Some printers work better with this type of image if you drag it to the desktop and print from there.


Printable How To Paint Flowers in a Vase Worksheet

My printables are free, so print as many as you like I only ask that you consider making a donation. Your gift of support will enable me to create more worksheets for you. 


Thank you for your support.

Below is a file that may print better on some printers.

CLICK HERE to go to an image file that may work better with newer printers.

PRINTABLE LESSON NOTES


COPY
Trace the outline of the project onto some 140 lb watercolor paper.  If the watercolor paper is too thick to see through then hold it against a window with daylight shining through then you should be able to trace it.

FIRST STEPS
Start with the background. Use a light blue with a large brush and try to keep it smooth.  Use a small brush to get around the flower and vase.

The table is brown so use a large brush to cover the area of the table.

ADD DEPTH TO THE BACKGROUND
In the lower area add a little darker blue or violet.

SHADOW ON THE TABLE.
Mix a little lavender with the light brown and put a little around the base of the vase on the shadow side.

FIRST STEP VASE
Use the same colors at the background and the table but use them lighter and watery to fill in the vase. Do not paint the entire vase leave some areas white

FIRST STEP FLOWERS
Coneflowers are a beautiful red/orange color. Start with light colors by using a lot of water.  Use a small brush and paint the flower petals red, and the center is orange.

Paint the stem a light green.

LET IT DRY

After this step dries add detail with a small brush.  Do not use too much water.  Mix lavender and red and with the small brush draw details by using the very tip of the brush.  Draw the shadows and lines in the petals, and where the petals connect to the flower.

Use brown to add a dark center to the center of the flower and add a dark side to the center.  Draw a green/brown line on the shadow side of the stems.

Use a watery black or dark blue and give the vase some shadows around the edge and on the shadow side

(c)Adron D. 7/16/15