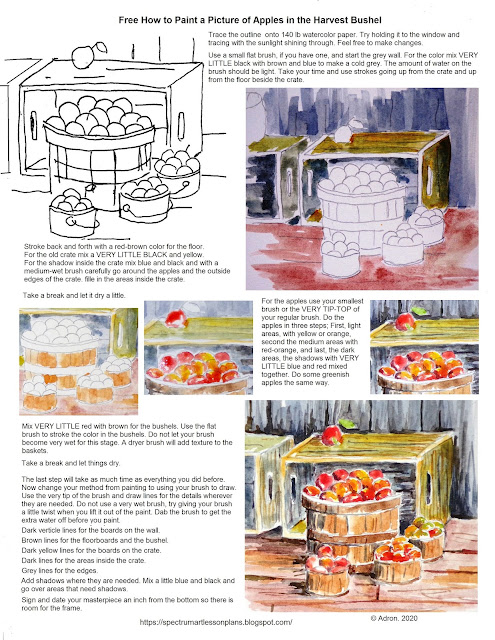
Here is a Free How To Paint Apples in the Harvest Bushel Worksheet.
This picture was inspired by a visit to a fruit stand in autumn. It celebrates the blessings of the harvest and the Lord, who gives us much to be thankful for.
 |
| How to Paint a Picture Of the Apple Harvest Bushel Worksheet |
My printables are free, so print as many as you like. They take a lot of my time. I often have to create several images before I get the right one for an illustration. It is a lot of work, but I am glad to have the opportunity to inspire others.
I only ask that you consider making a donation. Your gift of support will enable me to create more worksheets for you. Thank you for your support.
Here is a link to a PDF file that may work better for some printers.
CLICK HERE for a PDF of this worksheet.
If you have problems printing this worksheet, CLICK HERE to visit my how-to-print page for some suggestions. or try the updated link below.
This is a great little project for the beginner. This picture is somewhat simple. It is and is not intended to be overly realistic. I always felt if you wanted something as real as a photograph then you should buy a camera. You can use this worksheet as a beginning point and add your ideas and interpretations, so it is ok if your finished picture does not look like mine. (It might look better).
SUPPLY LIST
You can use any watercolor paint. I prefer my small Windsor Newton paint set; it has a nice selection of colors. I also use Grumbacher Paints in the tubes. You can easily find these at any craft store like Lobby Hobby or Michaels. (Look for coupons online.) You can collect lots of paintbrushes, but it is better at the start to keep it simple with a few small, medium, and medium-large brushes and a combination of flats as well as rounded paintbrushes. For these art lessons, I use Strathmore series 300 Watercolor paper. It is economical and available at Michaels and Hobby Lobby and online.
PRINTABLE NOTES
Start by tracing the outline of the picture onto 140 lb watercolor paper. If you have trouble seeing it through the paper try holding it to the window and tracing with the sunlight shining through. Do not be too worried to get it right, feel free to make changes.
Use a small flat brush, if you have one, and give the grey wall the first wash. For the color mix VERY LITTLE black with brown and blue to make a cold grey. The amount of water on the brush should be light. Take your time and use strokes going up from the crate and up from the floor beside the crate.
Use the small flat brush to stroke back and forth with a red-brown color for the floor.
Use the small flat brush and stroke the color on the crate. The crate is old and weathered looking so mix a VERY LITTLE BLACK and yellow so it looks dull.
You may need to switch to a round brush for the shadow inside the crate. Mix blue and black and with a medium-wet brush carefully go around the apples and the outside edges of the crate. fille in the areas inside the crate.
Take a break and let it dry a little.
Mix VERY LITTLE red into some brown for the bushels. Use the flat brush to stroke the color in the bushels. Do not let your brush become very wet for this stage. A dryer brush will add texture to the baskets.
For the apples use your smallest brush or the VERY TIP-TOP of your regular brush. Do the apples in three steps; First, light areas, with yellow or orange, second the medium areas with red-orange, and last, the dark areas, the shadows with VERY LITTLE blue and red mixed together. Do some greenish apples the same way.
Take a break and let things dry.
The last step will take as much time as everything you did before.
Now change your method from painting to using your brush to draw. Use the very tip of the brush and draw lines for the details wherever they are needed. Do not use a very wet brush, try giving your brush a little twist when you lift it out of the paint. Dab the brush to get the extra water off before you paint.
Dark verticle lines for the boards on the wall.
Brown lines for the floorboards and the bushel.
Dark yellow lines for the boards on the crate.
Dark lines for the areas inside the crate.
Grey lines for the edges.
Add shadows where they are needed. Mix a little blue and black and go over areas that need shadows.
Sign and date your masterpiece an inch from the bottom so there is room for the frame.
10/25/20 Adron © 2020
Please consider becoming my Patreon. Thank you.
Become a Patron!
No comments:
Post a Comment
Note: Only a member of this blog may post a comment.