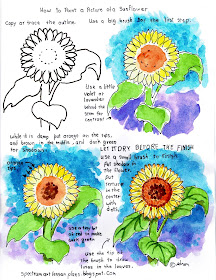
This is a free printable worksheet for how to paint a picture of a sunflower worksheet for personal or class use.
This is a fun project that many kids like. The sunflower is a popular subject. It will give the young artist a sense of accomplishment and confidence when it is done.Parents, teachers, and homeschool families will be able to use this in class or as a take-home project.
A WORD ABOUT PRINTING THE WORKSHEET
If you have problems printing, see the "CLICK HERE" to visit my how-to-print page.
My how-to-paint worksheets are free for you to print, and I hope you print as many as you can use. I only ask that you make a small contribution through Paypal. Click HERE and enter an amount. Your gift will let me know my worksheets are appreciated, and then I will be able to create more for you Thank you.
Below is a link that may print better for some systems.
CLICK HERE to go to an image file that may work better with newer printers.
ART SUPPLY LIST
You can use any watercolor paint. I prefer my small Windsor Newton paint set; it has a nice selection of colors. I also use Grumbacher Paints in the tubes. You can easily find these at any craft store like Lobby Hobby or Michaels. (Look for coupons online.) You can collect lots of paintbrushes, but it is better at the start to keep it simple with a few small, medium, and medium-large brushes and a combination of flats as well as rounded paintbrushes. For these art lessons, I use Strathmore series 300 Watercolor paper. It is economical and available at Michaels and Hobby Lobby and online.
TRACE
Copy the outline of the picture onto some 140 lb cold press watercolor paper. This is the heavy paper that will not buckle when it gets wet. Tracing through the heavy paper may be hard, I have a light I shine under the paper to trace, but if you can't shine a light through, you can try holding it against a window with the light coming through and tracing it.
FIRST WASH
With a medium-sized brush, use watery color and lay down the first layer of color. The background is completed in this step. Use blue behind the flower and a blue-lavender behind the bottom where the stem and leaves are. Mixing a little lavender with the blue gives a stronger contrast to the green stem and leaves. After the lavender dries, you may want to lay some more blue on top of it.
The flower is yellow petals and an orange center. The leaves and stems are green.
SECOND WASH
While it is all still mostly damp but not really wet.
* Dab a touch of orange at the tips of the petals and at the part where they touch the center.
* Dab little dots of brown into the center.
* Mix a darker green by adding a touch (only a touch) of red to some green and put in shadows.
LET IT DRY
After the work is done so far have dried then add the finishing touches. You want to use a small brush for the finish.
Mix a little orange and yellow and using the tip of the brush draw shadows between the petals.
Mix a little brown and orange and add dots for the seeds in the middle.
Mix more dark green and draw the lines in the leaves.
