The content of this blog, including my art and worksheets, are copyright protected. I do give permission to reproduce for personal and classroom uses a reasonable, limited amount of my content. You do not need to contact me to ask for permission. All other use is forbidden. For more details see the permissions and restrictions statement in the footer. Please use the Paypal button to make your donation.

Thursday, January 31, 2013

Printmaking with Styrofoam Plates Art Lesson

Spectrum Homeschool Art 2
Printmaking Week 3

This week we used Styrofoam to create as a block to make a plate for our print. Styrofoam plates were cut to a workable size then the image was drawn with a pencil onto the Styrofoam plate pressing hard enough to leave an impression. The plate was inked using a brayer, paper was pressed onto the plate and the image transferred.

Each student did the letter from their name. (Apologies; the instructor forgot to mention the very important mirror effect of printmaking- everything comes out backwards.)

Students created several images.
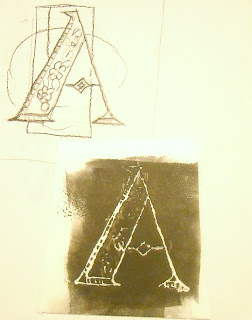
Illustration of print making class work 
The illustration above shows the rough sketch, top, used to design the block, below. The block has been inked the white is the area depressed by tracing the design onto the Styrofoam.

Printmaking Class Block and two prints- mirror image.

The illustration above shows the block, center, and two images created by the block. Note the image is reversed.

Thank you for visiting my blog.  I hope this project is fun and helpful for you. 

To find more like it see the labels at the right or choose one of the favorites in the left sidebar.  I am sure you will find one you like.

Adron


(C)Adron Dozat

Art 1 How to Draw Ribbons

Spectrum Home School Community.
Drawing Lesson for 1/31/13

In class today we covered several subjects.
Warm-ups from art class

Our warm ups
     1. Practice drawing and shading squares. Students gave effort to making lines straight.
     2. Serpentine lines. Students were focusing on making the curves equal on both top and bottom.
     3. A face of an animal, real or imaginary, but using only straight lines.
     4. Flags waving in the wind. This led to a demonstration and project.

How to Draw Ribbons From Art Class.
Demonstration: How to draw ribbons and flags. Using two curved lines that parallel for an inch then cross makes a flowing ribbon. A waving flag is a pair of parallel lines that curve back and forth but always parallel. The edges of the folds are drawn last. A pendant is a pair of lines in a triangle but each twisting back and forth and matching the other as they intersect.


We practiced shadows by setting up a lamp and having the light shine on some boxes, in this case Kleenex boxes. Instructor demonstrated drawing the boxes and pointed out the different degrees of shadow, such as shadow inside shadow, shadow with reflected light, some shadows were deeper than others, etc.


Sketch of Boxes showing Shadows.

(c)Adron Dozat

Thursday, January 24, 2013

Intorduction to Printmaking part 2

Printmaking lesson 2 for Spectrum Homeschool

This was the second lesson introduction for the printmaking class.

We did tracing prints. Tracing print is to lay a clean sheet of paper over the ink and then to trace a picture on the back of the paper. The ink will be pressed into the paper as we trace the picture. We did three or four images in class.

Below is an example of a Church window drawing on the right. The small paper was placed on the back of the larger paper on the left which lay on top of the ink and then traced. The ink was pressed into the paper reproducing the image.

Note the image is in reverse.


Illustration of tracing print
Below is another example of a tracing. A picture of a seagull was placed on the paper as it lay on the ink the seagull was traced leaving the image on the paper. Multiple images can be produced this way.

Example of tracing prints
Each tracing was a little less dark as the ink dried. It required refreshing.

(c)Adron Dozat

How to Use Different Lines in a Drawing. Art 1

Spectrum Art Lesson For Art 1 1/24/13
Warm-Up Activities for Drawing Lesson

Our class started with a warm-up exercise.
1. Cylinders.
2. Shadow bars each one is darker than the next.
3. Texture like leaves, using shapes like the letter "V" and "W" and similar shapes.
4. A quick drawing of an animal in silhouette.


2 minute Quick Sketch


We did a quick sketch challenge of drawing some tennis balls on a napkin. This is done in two minutes


We discussed various lines and how to use them the examples are:
     * Straight line
An example of student's notes on lines in the drawing.
     * Curved line
     * Wavy line
     * Zig-zag line
     * Short or choppy line, (this also is the line used as texture).
     * Puzzle piece shaped line, (also using the line as a texture).

Using a variety of lines makes a picture look interesting.

We are encouraging the use of tools such as a ruler to draw a straight line or a compass to draw a circle. After all, we would not have much confidence in a carpenter or mechanic who did not have tools why should an artist be any different?

Examples of line drawings were given from artist work see link: Coloring pages for kids.

Students class work was to draw a scene from a favorite movie or story and to try to incorporate as many lines types as they are able.

Students were allowed to choose a variety of subjects for optional drawing. Including a still life of common household items, pages from travel magazines and clippings of sports figures in play from newspapers.  They are encouraged to use a variety of lines in their drawing.


Thank you for visiting my blog.  I hope this project is fun and helpful for you. 

To find more like it see the labels or choose one of the favorites in the sidebar.  I am sure you will find one you like.


These are free to print but your small gift will help me keep this blog going, Choose your gift amount.

Use the share buttons below to share this, Thank you.

(c) Adron Dozat

Thursday, January 17, 2013

How to Give Variety to Edges in Drawing

Home School Art
Drawing with Edges


In class today we will have an example of drawing using pencil to give different edges to a picture. This creates interest and variety in a drawing.

We will start with some warm up exercises.
     1. Using the cheek of the pencil, (that is holding the pencil so the side of the medium is against the paper) we will draw swayback shapes back and forth.
     2. Using the cheek of the pencil draw gray bars that are dark at one end and light at the other.
     3. Switching to the tip of the pencil drawing bubbles.
     4. Using the tip of the pencil draw cross hatching.

Exercise: We will draw some cubes and box shapes with different values of grey and a variety of edges some edges are to be sharp and some to be soft and fuzzy. Use the cheek of the pencil for the soft edge, use a blending stub or finger to rub the edge fuzzy. Use the tip of the pencil for sharp edge.

If time allows: Students are to draw a robot with different edges some soft and some sharp. The robot is to be a member of their family characterized as a robot doing a favorite activity. Give the robot metal look with shading, seams, bolts, lights, dials, antenna, one or two pieces of clothing.  Draw some part of the environment like dad robot at his desk or sister robot at computer or brother robot at soccer.

Students will draw something from their backpack or from pocket. Focus on the edges; some and sharp some soft.

Example of warm ups.
Example of  Drawing What I Had On Hand.


Thank you for visiting my blog.  I hope this project is fun and helpful for you. 

To find more like it see the labels, use the search-box above, or choose one of the favorites in the sidebar.  I am sure you will find one you like.

Adron


These are free to print but your small gift will help me keep this blog going, Choose your gift amount.

Use the share buttons below to share this, Thank you.

(c) Adron

How to Make a Print By Drawing In The Ink

Homeschooling Lesson for
Printmaking and Monoprint


This is the first lesson in our print making unit. We will briefly cover the concept of print making and the tools used.

Basic printmaking is to create a picture by transferring an image from a source to the paper. Most prints are done in editions where many images are produced. They are numbered and signed such as 1/10 meaing in this example one of ten.

Today we will be creating a monoprint. A monoprint is a edition of one.

To make our monoprint it is important to have a design already prepared since the ink dries in a few minutes and you do not have time to conceive and work out the details of your design. So we will take a few minutes and create some line drawings studies on scratch paper to be prepared for our project.

1. We apply a small amount (about the size of a quarter) of ink to the surface. We have Plexiglas, but any flat surface will work, like a mirror, a pie-pan lid, or plastic as long as it is absolutely flat.
2 We roll the ink with the brayer to cover an area,  about the 4 inches by 4 inches.
3. Choose one of the studies and using a very dull pencil, rounded chop-sick, Popsicle stick, crayon or any combination draw the image directly into the ink.
4. Carefully lay the paper directly on the plate with the ink and its drawing.
5. With one hand holding the project steady use the palm of the other hand to press the paper down, be careful not to smudge or move the paper from its original position.
6. Carefully lift the paper up.
7. Admire your creation!

Changes can be made in the original and a second print may be created, this second print will be lighter.

Experimenting is encouraged to make prints with lines shapes and texture.

We sign our works and label them Monoprint 1/1 and date.

Allow yourself 10 minutes for clean-up. Soap and water is fine.

Flowers: A Monoprint made by Drawing in The Ink.

Tree: a Monoprint made by Drawing in The Ink

Fish: a Monoprint Made by Drawing in Ink

(c)Adron Dozat

Thank you for visiting my blog.  I hope this project is fun and helpful for you. 

To find more like it see the labels at the right, use the search-box above, or choose one of the favorites in the left sidebar.  I am sure you will find one you like.


These are free to print but your small gift will help me keep this blog going, Choose your gift amount.

Use the share buttons below to share this, Thank you.

Thursday, January 10, 2013

How To Use An Edge To Compose A Picture. Art 1 Lesson

Home School Art Lesson 
Using an Edge in a picture.


Our class started with some warm up exercises:
     * Triangles. Draw a row of triangles where each line is straight and the triangles are perfect.
     * Double Curves. This is shaped like an "S" but emphasis is to make the top and bottom matching curves.
     * Concave lines in a twisting row. Here the lines of a zig-zag are all curved.
     * Practice of drawing "Articulated" Stick figures. These stick figures have elbows knees, chest and hips. 

Warm up exercises for art 1, January 10
Most students start drawing with lines and progress to other elements. Some grow up and return to lines as masters.

Our demonstration started with a line drawing of a baseball bat, a toy chest and a toy boat. All began as line drawing. The picture was gone over again using shading technique so the lines were now edges between the light and dark areas. There are elements left of the lines, and elements of shadow and elements of negative space in the finished project. The remaining line of the crack between the top lid and base of the toy box is more interesting even meaningful when all the other lines are turned into edges of the dark and light areas.

Example of using edge instead of line.

After the demonstration the students composed their own pictures to practice the technique of using an edge instead of a line.

(c) Adron Dozat

How to Use Color for Brilliance in Watercolor. Art 2.

Homeschool Painting Lesson
Using Color for Effect


This is the last week in our watercolor unit.

In class we will have a demonstration of how to use color for effect. There are several techniques for this. We used muddied dark colors to bring out the contrasting pure light colors. The muddied colors were mixed with brown, purple, blue, and green the colors blends to make a dulling effect. This can add a dramatic effect bringing out the lighter colors.

Illustration of color for effect
The example of the mushroom illustrates using multiple colors to make a "Muddy" dark background to give a contrast to the pale pure colors of the the mushroom where few colors were used in wash.
Illustration of color for effect.


The illustration of the butterfly show the contrast of using contrasting colors to highlight each other.  Green is opposite of pink so each color makes the other appear more brilliant.

Next week we will start the unit on print making. The supply list is posted elsewhere on the blog. 

(c)Adron Dozat


Thank you for visiting my blog.  I hope this project is fun and helpful for you. 

Supply list for unit 3 printmaking by hand

Supply list for print making by hand.
Spectrum Home School Community

The third quarter is our printmaking unit.I am very excited about this course.
I am sensitive to the need to keep cost down so I suggest you consider the coupons available at most stores like Michaels, and Hobby Lobby. These supplies can be found at both locations, Michaels has shipping discounts available too.

We will be using ink. I only use the Speedball brand that comes in a tube. The individual tubes cost about 8 dollars.

1 Tube of black ink. we will use black for almost all projects
1 multi pack ink that has red, blue, yellow, and black.- these are smaller tubes. we will be using colors only after the 3rd week, so no rush.
(Optional) a brayer it is a rubber roller for applying ink to the surface, I have extras we can share if you can't get one. We may be borrowing some from another home school group.
A hard flat surface like a mirror, sheet of plexiglass, pie pan lid, plastic clip board etc. it needs to be washable.
Paper. We will use lightweight paper like common printer paper from your computer. We have received a donation enough for our needs.
Cardboard that can be cut easily like from a cereal box. Not needed the first two weeks.
Random junk that can be glued to a surface to make a printable collage, buttons, bobby pins, paperclips, bottle caps etc. Not needed until the 7 or 8th week but start collecting now.
Styrofoam plates for the 3rd and 4th week maybe 5th week. It needs to be the type of soft plate that one can press in image in and it stays down, and easy to cut.
Craft foam the type that is rubbery and soft there is an entire isle of it at Michaels we just need 1 sheet of 9x11 or something like that size. Any color.
Double sided tape.
White glue.
A few sheets of stiff cardboard like from the back of an old binder or sketchbook. We won't need this until the 2nd half of the unit.

If you are wondering: I will NOT be using knives to carve lino like our generation was taught back in the 70s. I have safety concerns. Lino is is a good method and makes wonderful projects but we only meet once a week and not enough time to complete a project, since most of our projects are done in one class.  If a student wants to cut lino with a set of carving knives they are welcome to bring the finished project to class to print. Instead of lino I use the rubbery craft foam that can easily be cut with scissors or craft knife.

(c)Adron Dozat

Thursday, January 3, 2013

Watercolor Painting With Abstract Effects

Art 2
Exploring the use of secondary objects to give interest in watercolor painting.

We will start with random shapes and spaces to make an interesting abstract picture. Our subject will be an owl or a cat or a face.

We will experiment with different mediums to create effects with the watercolor.

     * Sprinkle salt into the water wash. The wash must be very watery.
     * Tape off an area with blue painters tape before painting it. Do this before you paint.
     * Marking off  a pattern with a white candle for resist. Do this before you paint.
     * Applying crumpled tissue to the picture. Hold it down to the wet paper until it drys.
     * Applying crumpled cellophane to the picture. Hold it down until the paper drys.
     * Splatter around a marked off area.
     * Dribble and let color run in a random pattern. You may need to "tickle" it a bit with the brush to get the paint to run down and cross tape or candle wax.

Example project.

An example of abstract techniques.
Note in the example the taped off areas at an angle. The tape was left on in this instance until the project was done.

The candle wax mimics the pattern of the owl's feathers. This is best observed in the lower quarter.

Splattering is present in various locations. Contrasting color and Paynes gray was used in the splatter.

Dripping and random running of green and red color from the top down.

Unfortunately, the crumpled cellophane did not photograph well but if you look hard you can see the random creases in the upper right area.

Area that was covered with a circle of cardboard by the right wing.

To bring the owl back up an ink pin was used to outline the owl.

These were a lot of techniques to apply to one project. The purpose of this lesson  is to introduce these techniques. Practice is needed to master this approach, the students are encouraged to experiment with this approach on their own.
(c)Adron Dozat

How To Find an Idea For Drawing With Creativity

Spectrum Homeschool Community Art 1 
Drawing with Creativity
And How to Find Ideas.


Drawing with creativity is a drawing lesson that teaches how to come up with ideas through the free association method. 

Warm ups: 
Warm ups used for an art lesson. 
     1. Cursive "Cs" linked together like ocean waves. 
     2. Flame shapes. 
     3. Squares connecting to make a maze. 
     4. Using scribbling style draw an animal of their own choosing.

When an artist of any discipline have a block of creativity some will use free association methods to acquire ideas. This is done by noting down random thoughts or images, which relaxes the mind and allows the imagination to bring up ideas. The random thoughts can be noted in the margin of the sketchbook or a scrap of paper, or can be done as doodles. The random thoughts can be acquired from items in the room or items from resource materials one uses. After a few minutes, the ideas are experimented with to see if they produce a workable project.

Exercise one.
To help the young artist practice the technique a list of random words will be given, (different w). They are instructed to look at each word one by one and if a word gives an inspiration they write down the inspiration. The student repeats this process with each word until they have a concept for a project.

Step one:    Look at the word from the list.
Step two:   Get an idea from that  word.
Step three:  Record the idea, write down a word or scribble a picture.
Step four:   Explore your ideas on scratch paper.
Step five:   Combine ideas or choose one for your project.

Students are given ten random words from the sample word list below:

candle frog door love heart down cat screen angry bucket sunset ketchup shark spaceship submarine werewolf train bride pumpkin happy dirt crash money street candy window cloud blender stove chair rug book socks hat feather hand nest fish sad bucket tree friend remote river rock dock planter angel gong shoe puppy cake balloon band road trash soda store lost found up down right left clock five two twin tower Africa beach ray car skateboard river rock sing sting band-aid hero foe friend mom dad friend toothpaste egg pan evil good angel scarecrow owl lamp old young tree fire ladder flying running mouse.

These words are not the ideas but are the source of an inspiration. The young student is prone to simply take the words and illustrate them but the goal is to find a new theme or subject from the words.

Exercise two.

Similar to exercise one but without the word list. The student is asked to look around them and write down ten things they see and from those things create a project to draw.

Exercise three.

Similar to those above but without visual:
The student thinks of ten or more words and writes them down until the student gets an inspiration for a drawing.

If time allows the student is to illustrate a scene from a child's story of their choosing.

(c)Adron Dozat